
4
Floating into a forearm stand—often called Pincha Mayurasana—is one of those yoga skills that looks effortless but is built on patience, strength, and body awareness. If you’ve ever watched someone gently lift both feet off the floor and hover with control, you’ve probably wondered how they did it without kicking or jumping.
The good news: you can learn it too.
This follow-along guide will walk you step by step—from warming up your shoulders to understanding the mechanics of the float—so you can practice safely and confidently. Move slowly, breathe deeply, and remember: progress comes from consistency, not force.
🌿 Step 1 — Set Your Intention and Mindset
Before you even get on your mat, take a moment to check in with yourself.
Floating into forearm stand isn’t just physical—it requires calm focus. If you rush or approach with tension, your body will resist. Instead, think of this as an exploration.
Tell yourself:
- “I’m practicing, not performing.”
- “Every attempt builds strength.”
- “It’s okay to use the wall.”
A relaxed mind helps the body coordinate more efficiently.
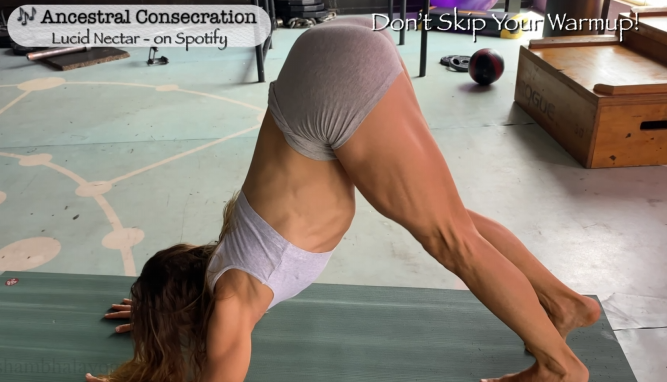
🔥 Step 2 — Warm Up Thoroughly (Don’t Skip!)
Your shoulders, core, and wrists need to be ready.
Shoulder Warm-Up (2–3 minutes)
- Arm circles forward and back
- Shoulder shrugs
- Thread-the-needle stretch
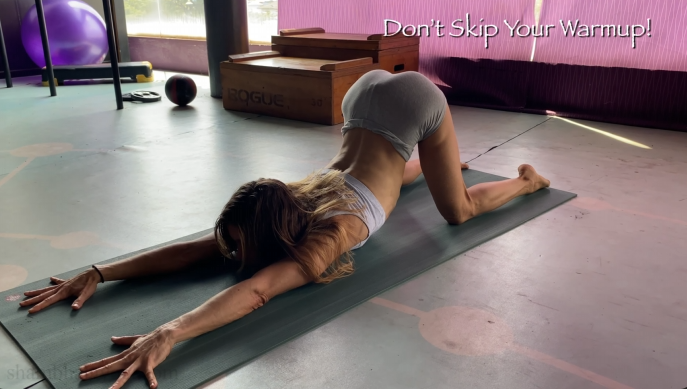
Dolphin Pose (1–2 minutes)
Come onto forearms and lift hips high.
Focus on:
- Pressing forearms firmly down
- Broadening across the upper back
- Engaging your core
This builds the exact strength you’ll use to float.
Forearm Plank (30–60 seconds)
Activate deep core muscles.
Think:
- Ribs hugging in
- Belly lifting
- Heels reaching back
🧠 Step 3 — Understand the “Float” Concept
Floating isn’t about jumping.
It’s about shifting your center of gravity over your shoulders so your feet naturally become light.
Imagine stacking:
Forearms → Shoulders → Hips → Feet
When hips move forward enough, your feet lift almost automatically.
Key principle: Lean before you lift.
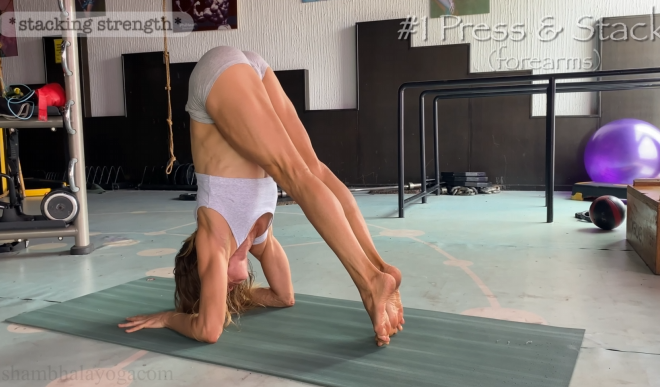
🧘 Step 4 — Set Up Your Base
- Come onto your forearms.
- Elbows shoulder-width apart.
- Spread fingers wide.
- Press evenly through forearms.
Engage strongly:
- Inner arms hugging in
- Shoulders lifting away from floor
- Core firm
Your forearms are your foundation—treat them like roots growing into the mat.
🐬 Step 5 — Walk In (Like Dolphin)
Lift hips high and walk your feet toward your elbows.
Go farther than you think.
Your hips should stack closer over shoulders. You may feel like you’re “too far”—that’s usually correct.
Keep breathing slowly.
✨ Step 6 — Practice the Tuck Float
This is the safest and most controlled entry.
Follow Along:
- Bend one knee slightly.
- Shift shoulders forward.
- Draw both knees toward chest.
- Lightly lift one foot… then the other.
Even if feet barely hover, that’s progress.
Think:
- “Lift from the core.”
- “Stay rounded like a ball.”
- “Move slowly.”
Avoid kicking. Kicking trains momentum, not control.
🪶 Step 7 — Hold the Hover
If both feet lift, pause in a tuck.
Focus on:
- Forearms pressing down
- Belly lifting up
- Neck relaxed (gaze slightly forward)
Even one second is enough. Over time, that becomes five… then ten.
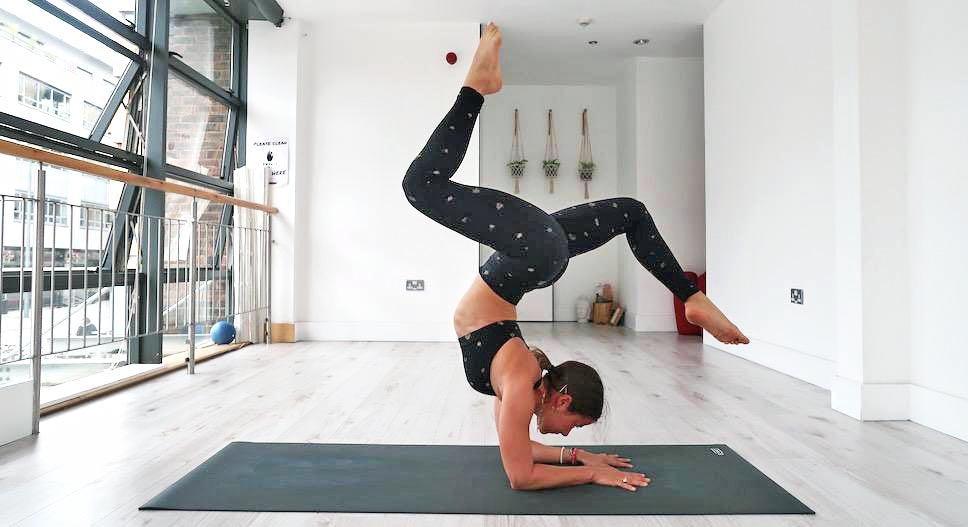
🌈 Step 8 — Extend Into Forearm Stand
When stable:
- Slowly straighten legs upward.
- Reach through toes.
- Keep ribs contained.
Imagine growing taller through your heels.
Your body should feel long and buoyant—not rigid.
🧱 Step 9 — Use the Wall (Smart Practice)
Practicing near a wall builds confidence.
Try this:
- Set forearms 10–15 cm from wall.
- Float into tuck.
- Lightly touch wall if needed.
The wall prevents fear from triggering a kick.
Over time, rely on it less.
🫁 Breathing Guidance
Breath keeps you calm.
Try this rhythm:
- Inhale — prepare and lift hips.
- Exhale — float knees in.
- Slow steady breathing — hold.
Holding breath creates tension—avoid it.
⚠️ Common Mistakes to Watch For
❌ Jumping or kicking
Creates instability.
❌ Collapsing shoulders
Leads to strain.
Think “push the floor away.”
❌ Overarching back
Engage lower ribs.
❌ Looking too far forward
Keep neck neutral.
💪 Strength Drills to Accelerate Progress
Practice these regularly:
- Dolphin push-ups (8–10 reps)
- Hollow body hold (30 seconds)
- Wall forearm stand holds
- Pike compressions
These build the exact muscles needed for floating.
🧘 Sample Follow-Along Mini Flow (10 Minutes)
- 1 min shoulder rolls
- 1 min dolphin pose
- 30 sec forearm plank
- Walk in and practice tuck (5 attempts)
- Rest in child’s pose
- Repeat cycle
Consistency matters more than duration.
🧡 Working Through Fear
Being upside down can feel intimidating.
Try:
- Visualizing success
- Practicing near soft padding
- Falling safely (roll out sideways)
Fear decreases with exposure.
Remember: control reduces fear.
🪞 Mental Cues That Help
Repeat these while practicing:
- “Lean forward.”
- “Lift from the belly.”
- “Stay light.”
- “Slow is strong.”
Simple cues improve coordination.
📈 What Progress Looks Like
Week by week you may notice:
- Feet feel lighter
- Less reliance on kicking
- Longer holds
- More shoulder strength
- Improved confidence
Celebrate small wins.
Floating is a journey.
🌟 Advanced Tip — The Quiet Lift
Watch experienced practitioners and you’ll notice something: the lift is silent.
Aim for quiet feet.
If you hear a thump, you’re using momentum.
Silence equals control.
💤 Cool Down After Practice
Always release tension.
Try:
- Puppy pose
- Shoulder stretch
- Gentle twists
- Slow breathing
This prevents tightness and supports recovery.
💬 Final Encouragement
Floating into forearm stand is not about perfection—it’s about curiosity.
Some days you’ll feel strong. Other days you won’t lift at all. Both are part of the process.
What matters most is showing up, breathing, and exploring your edge with patience.
One day, almost unexpectedly, you’ll lean forward… engage your core… and your feet will lift with ease.
You’ll realize it didn’t happen because you forced it.
It happened because you practiced.