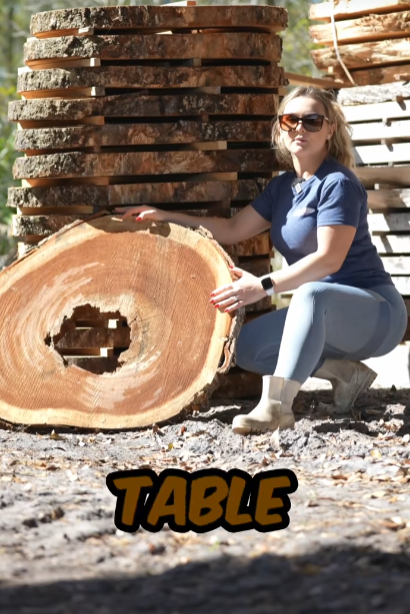
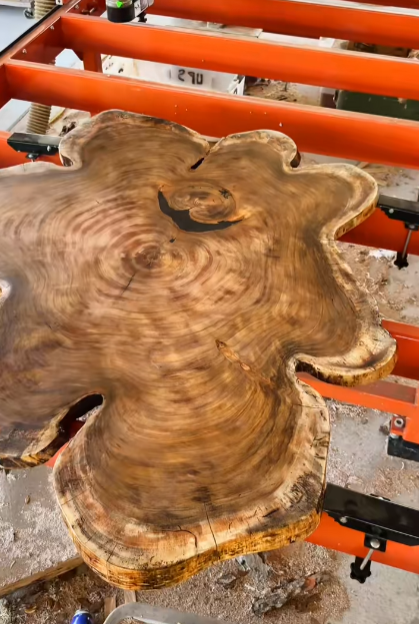
When it comes to woodworking, few things are as satisfying—and as challenging—as working with a giant slab of monkey pod wood. These slabs, often referred to as “cookies” when they’re cross-cut from the trunk, are truly one-of-a-kind. They can be over three feet in diameter, several inches thick, and feature stunning grain patterns that look like natural art. But before you can turn one into a table, centerpiece, or any other masterpiece, there’s a crucial step: flattening the cookie. Today, we’re diving into the process of flattening a big monkey pod cookie—from raw cut to smooth perfection.
What is a Monkey Pod Cookie?
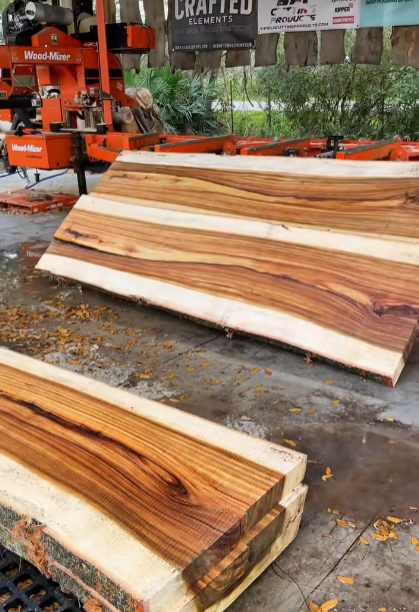
A monkey pod cookie is a circular slab of wood sliced crosswise from the trunk of a monkey pod tree. Monkey pod, also known as Albizia saman or rain tree, is a tropical hardwood known for its unique color variations—warm browns, golden yellows, and even hints of black. These cookies are especially popular for coffee tables, wall art, and countertops due to their dramatic appearance.
However, because they’re cut across the grain, these cookies are highly prone to warping, cupping, and cracking. That’s why flattening is not just about aesthetics—it’s a structural necessity.
Step 1: Understanding the Challenge
When you first get your hands on a monkey pod cookie, it may look amazing—but it’s probably far from flat. Depending on how it was dried (air-dried, kiln-dried, or just left sitting for months), the cookie may have warped, twisted, or developed uneven high and low spots. Trying to build something out of it without flattening it first would lead to wobbling tables, uneven surfaces, and even structural failure.
That’s where the flattening process comes in. But with a cookie this big and heavy—often over 100 pounds—you need the right tools and a careful strategy.
Step 2: Prepping the Slab
Before anything else, the surface needs to be cleaned. Start by removing any dirt, bark remnants, or debris using a stiff brush or compressed air. If the bark is still on and you’re planning to keep it, secure it with wood hardener or epoxy. If you’re removing it, now is the time to chisel it off.
Next, give the surface a quick visual and tactile inspection. Look for cracks, high spots, and deep gouges. Mark any noticeable problem areas with chalk or a marker. This will help guide your flattening process.
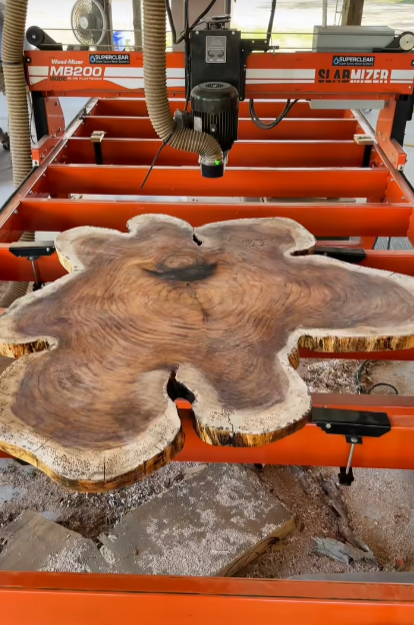
Step 3: Building a Flattening Jig
Unless you own an industrial-sized drum sander or wide-belt planer (and most of us don’t), the most practical way to flatten a large cookie is with a router sled.
A router sled is a simple but effective jig that allows you to move a router back and forth in a controlled, level way. Here’s what you need:
- Two long rails (straight, level 2x4s or metal tracks)
- A flat base for the cookie
- A sled to hold your router
- A plunge router with a wide flattening bit (1.5″ to 2″ diameter)
Place the cookie on a base that’s as flat and sturdy as possible. Shim the cookie so it doesn’t rock or move during the process. Then set your rails along either side and ensure they are perfectly level with each other—this is crucial.
Step 4: Flattening Begins!
With your jig built and the cookie secured, it’s time to start flattening. Begin with shallow passes using your router. Start on one end and slowly move the sled across the surface, adjusting depth as needed. Don’t try to remove too much at once—doing so can tear out the grain or damage the bit.
After completing the first side, flip the cookie and repeat the process. Remember, the bottom doesn’t have to be as perfect as the top, but it should still be level and stable.
This is a messy job—expect a lot of dust and wood shavings. If you’re working indoors, use proper dust collection and wear a respirator.
Step 5: Filling Cracks and Voids
Monkey pod cookies often have natural cracks, voids, or insect holes. These can add character, but they also need to be stabilized. This is where epoxy resin comes into play.
Mix your epoxy and add a tint if desired (black or dark brown looks natural). Carefully pour it into any cracks, being sure to overfill slightly so you can sand it flush later. If you’re going for a modern or artistic look, you can get creative with colored pigments, glow-in-the-dark powder, or metallic flakes.
Let the epoxy cure fully—this can take up to 24 hours depending on the brand.
Step 6: Sanding and Smoothing
Once the epoxy has cured and your cookie is roughly flattened, it’s time to sand. Begin with 60- or 80-grit sandpaper to remove router lines and level the surface. Then work your way up through 120, 180, and finally 220 grit for a buttery smooth finish.
Take your time here—the quality of your sanding will directly impact the beauty of your final product. Use a random orbital sander to avoid swirl marks and sand with the grain as much as possible.
Step 7: Choosing a Finish
With the cookie now perfectly flat and smooth, the final step is to apply a finish. This not only brings out the color and grain but also protects the wood from moisture and wear.
Some popular finishes include:
- Danish oil: Easy to apply and gives a natural matte look.
- Tung oil: Deeper penetration with a rich, warm tone.
- Polyurethane: Durable and glossy, great for high-traffic surfaces.
- Epoxy topcoat: For a high-gloss, glass-like surface—ideal for modern designs.
Apply your finish with a clean rag or brush, working in thin, even coats. Allow adequate drying time between coats, and lightly sand between each for best results.
Step 8: Displaying the Masterpiece
Once the finish is dry and cured, your big monkey pod cookie is ready to be admired. Mount it on a metal base to create a live-edge coffee table. Hang it on the wall with heavy-duty brackets. Or simply place it as a conversation piece in your home or shop.
Every cookie is unique—no two are alike. The combination of nature’s artistry and your hard work will make this piece something truly special.
Final Thoughts
Flattening a big monkey pod cookie is not a quick job—it requires patience, the right tools, and a love for woodworking. But the payoff is worth every minute. From a rough, uneven slab to a stunning centerpiece, this process transforms raw wood into functional art.
Whether you’re a weekend woodworker or a seasoned craftsman, there’s nothing quite like the satisfaction of running your hand over a perfectly flat, glowing monkey pod surface and knowing you brought it to life.