He was trembling before we even reached him.
From a distance, we could see his small body shaking uncontrollably, pressed against the rusted gate at the edge of an empty lot. His cries were thin and broken, rising and falling like the sound of a frightened child who had cried for too long. Every few seconds, he glanced around wildly, as if expecting danger to come from every direction at once. Fear clung to him like a second skin.
This was not just a dog who was lost.
This was a dog who had been abandoned.
The ground beneath him was cold and damp, scattered with trash and sharp stones. His fur was dirty and tangled, offering little protection from the chill in the air. His ribs showed clearly with every shaky breath, and his legs looked too weak to carry him very far. Hunger and exhaustion had already taken their toll, but fear was what truly paralyzed him.
He cried because he didn’t understand.
One day, the world had made sense. There had been a human, a routine, a place where he belonged. Then, without warning, everything disappeared. No explanation. No goodbye. Just loneliness and terror where safety once lived. Animals do not understand abandonment. They only know that the one they trusted is suddenly gone.
And now, every human face looked like a threat.
When he noticed us approaching, his fear intensified instantly. His cries grew louder, more desperate. He tried to back away, but the fence behind him offered no escape. His claws scraped helplessly against the dirt as he curled inward, trying to make himself smaller, trying to disappear.
We stopped.
This was the most important moment. One wrong move could confirm every fear he had learned. We crouched down slowly, keeping our distance, lowering ourselves so we didn’t tower over him. Our voices softened naturally, as if speaking louder might break him completely.
“It’s okay,” we whispered. “We’re not going to hurt you.”
Of course, he didn’t believe us.
Why would he? Every experience had taught him that humans leave, that they hurt, that they cannot be trusted. His trembling didn’t stop. His crying turned into hoarse whimpers, each one cutting deeply into our hearts. Tears streaked down his muzzle, leaving dark tracks through the dirt on his face.
We sat there for a long time.
Cars passed in the distance. The wind shifted. Time stretched on. But we stayed exactly where we were. In a life full of people who had walked away, staying was the first step toward saving him.
Slowly, his cries softened. Not because his fear was gone, but because exhaustion was winning. His eyes never left us, watching every breath we took, every small movement. But something subtle changed. He stopped trying to escape. He simply shook and watched.
We gently slid a small bowl of food toward him and then backed away. The smell reached him immediately. His nose twitched, his body tensed. Hunger and fear battled fiercely inside him. For a long moment, he didn’t move at all.
Then, inch by inch, he crawled forward.
Every step was cautious. His body stayed low to the ground, ready to bolt. When he finally reached the bowl, he ate quickly, desperately, as if afraid the food might vanish if he didn’t finish fast enough. His trembling continued even as he ate, but his cries faded into silence.
That silence was loud.
It was the silence of a dog who was still terrified but beginning, just barely, to hope.
When he finished eating, he retreated back to the gate, curling into himself again. We offered water next, repeating the same careful process. He drank deeply, his body clearly desperate for hydration. When he was done, he looked at us again—not with trust, but with confusion.
Why weren’t we leaving?
Why weren’t we hurting him?
The rescue itself had to be gentle.
We knew that grabbing him suddenly would undo everything. So we moved slowly, letting him see each step. When we carefully wrapped him in a soft blanket, panic surged through him again. He cried and shook violently, his body stiff with fear. He didn’t understand that the warmth was meant to protect him. All he felt was loss of control.
But as we held him close, something unexpected happened.
His cries softened.
The trembling didn’t stop completely, but it slowed. His body sagged slightly, exhaustion overtaking panic. For the first time since being abandoned, he was no longer exposed to the cold or the world’s dangers. He was pressed against warmth, against steady hands that did not let go.
He still didn’t understand we were there to save him.
But his body was beginning to feel something new: safety.

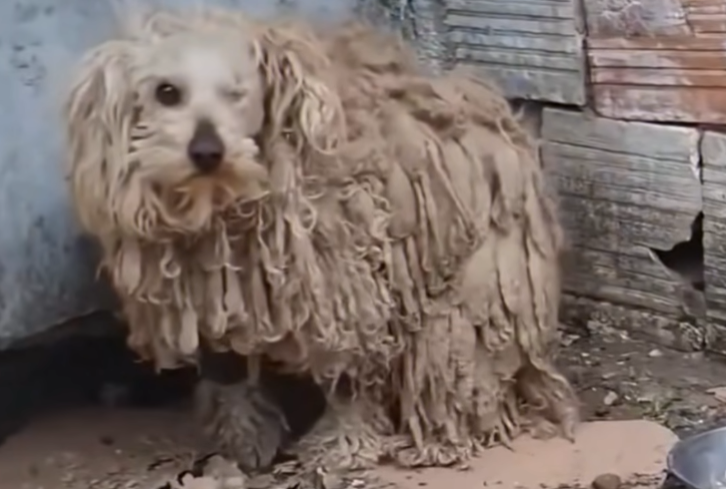
At the veterinary clinic, the full extent of his suffering became clear. He was severely underweight and dehydrated. Small wounds covered his body—some fresh, others old and poorly healed. The vet spoke gently but with concern.
“He’s been neglected for a long time,” they said. “And emotionally… he’s terrified.”
Treatment began immediately. Fluids were administered slowly, carefully. His wounds were cleaned. Soft bedding replaced hard ground. Even then, his trembling continued. Sudden sounds made him flinch. New faces caused him to cry again. His body was safe, but his mind was still trapped in fear.
The days that followed were not easy.
He cried at night, soft, broken sounds that echoed through the quiet room. Sometimes he trembled so hard it seemed impossible that he could ever relax. Loud noises sent him cowering into corners. Even gentle hands made him freeze at times.
So we changed our approach.
We stopped trying to comfort him with touch and instead comforted him with presence. We sat nearby without reaching out. We spoke softly. We let him choose when to come closer. Food arrived on schedule every day. Water was always available. Clean blankets were replaced regularly. Routine became his anchor.
Slowly, very slowly, his trembling began to ease.
Not disappear—just ease.
He started to sleep more deeply, his body finally allowing itself to rest. His cries became less frequent. His eyes, once wide with terror, softened. He began to observe instead of panic. To listen instead of flee.
One morning, as we entered the room, his tail moved.
It was barely noticeable—a small, uncertain wag. But it was there. That tiny motion felt like a miracle. It meant that somewhere beneath the fear, there was still joy waiting to return.
From that day on, progress came in small but powerful steps. He accepted gentle touch. He leaned into a hand instead of shrinking away. He followed us with his eyes, then with his body. His cries disappeared completely, replaced by quiet sighs as he slept.

Weeks passed, and the transformation was remarkable.
The dog who once trembled uncontrollably now walked with cautious confidence. He explored his surroundings, sniffing curiously, learning that the world was no longer something to fear. His body grew stronger as he gained weight. His coat began to shine again. But the most beautiful change was in his eyes.
They held trust.
Looking at him now, it is hard to imagine that trembling, crying figure we found by the gate. But we remember. We always remember. Because his story matters.
He didn’t understand we were there to save him.
He only understood fear.
And that is something rescuers learn again and again: when an animal has been deeply hurt, rescue does not feel like relief at first. It feels like another threat. Gratitude does not come immediately. Trust must be earned gently, patiently, without expectation.
Today, he sleeps peacefully, stretched out comfortably, his breathing slow and steady. He eats without fear of losing his food. He greets familiar faces with a wagging tail instead of trembling legs. The world no longer feels like a place where danger waits at every corner.
He is safe.
He is loved.
And his story stands as a reminder that saving a life doesn’t always look heroic in the moment. Sometimes it looks like sitting quietly on the ground, waiting for a terrified soul to realize that this time, the humans are not leaving.
This time, they came to save him.
And they stayed.