
The Exhaust Gas Recirculation (EGR) valve plays a crucial role in reducing vehicle emissions and improving engine efficiency. Over time, carbon buildup can clog the valve, leading to performance issues such as rough idling, reduced fuel efficiency, and increased emissions. Cleaning the EGR valve is an essential maintenance task that can extend the life of your engine and improve overall performance. This guide will walk you through the process of cleaning your EGR valve step by step.
What is an EGR Valve and Why is it Important?
The EGR valve is a component in the vehicle’s emission control system. It helps reduce nitrogen oxide (NOx) emissions by recirculating a portion of exhaust gases back into the combustion chamber. This lowers the combustion temperature, thereby reducing harmful emissions. However, over time, carbon deposits from exhaust gases can clog the valve, affecting its function.
Signs That Your EGR Valve Needs Cleaning
Before you start cleaning the EGR valve, it’s important to identify whether it actually needs maintenance. Here are some common signs of a dirty or clogged EGR valve:
- Rough idling – The engine may shake or vibrate when at a stop.
- Reduced fuel efficiency – More fuel is consumed as the engine struggles to operate efficiently.
- Increased emissions – A clogged valve can lead to excessive exhaust smoke.
- Engine knocking – Higher combustion temperatures due to a malfunctioning EGR can cause knocking sounds.
- Check Engine Light (CEL) illuminated – A diagnostic trouble code (DTC) related to the EGR system may be detected by an OBD-II scanner.
Tools and Materials Needed
Before starting, gather the following tools and materials:
- Socket set and ratchet
- Wrench set
- Flathead screwdriver
- Cleaning solvent (carburetor cleaner or dedicated EGR cleaner)
- Soft-bristle brush or pipe cleaner
- Shop rags or paper towels
- Safety gloves and goggles
- Gasket replacement (if needed)
Step-by-Step Guide to Cleaning the EGR Valve
Step 1: Safety First
Before working on your vehicle, ensure that it is parked on a level surface. Turn off the engine and let it cool down completely. Disconnect the battery to prevent any electrical accidents.
Step 2: Locate the EGR Valve
The EGR valve is typically found on or near the intake manifold. Its location varies depending on the make and model of your vehicle, so consult your owner’s manual or look up a diagram online if necessary.
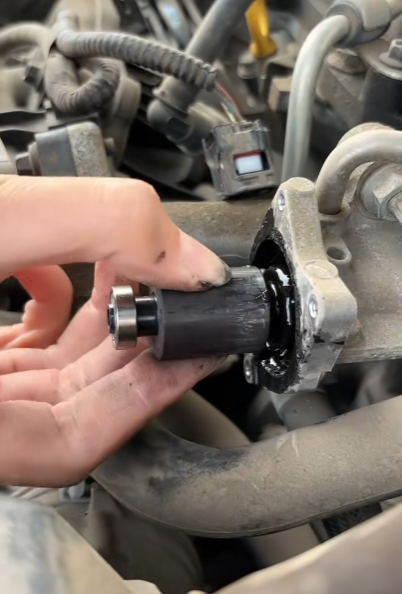
Step 3: Remove the EGR Valve
- Disconnect any electrical connectors and vacuum hoses attached to the EGR valve.
- Use a socket wrench or wrench set to carefully unbolt the EGR valve from its mounting position.
- Be mindful of the gasket; if it’s damaged or worn, it should be replaced.
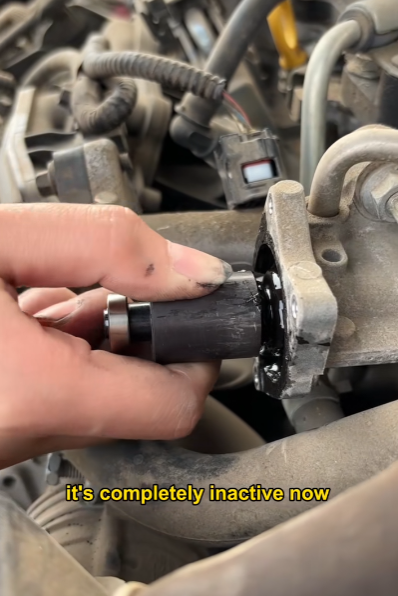
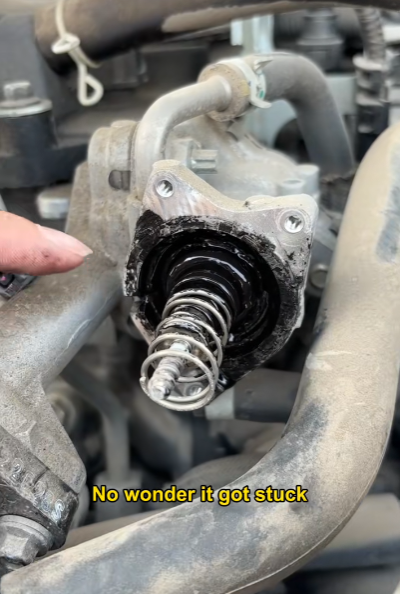
Step 4: Inspect the EGR Valve
Examine the EGR valve for carbon buildup. If there is excessive soot and deposits, it is likely obstructing the flow of exhaust gases. Inspect the diaphragm (if applicable) for damage or sticking.
Step 5: Clean the EGR Valve
- Spray the cleaning solvent onto the dirty areas of the valve, making sure to coat all carbon deposits.
- Let the solvent sit for a few minutes to break down the buildup.
- Use a soft-bristle brush or pipe cleaner to scrub away the loosened carbon deposits.
- Wipe down the valve with a clean shop rag or paper towel.
- Repeat the process if necessary until the valve is free of deposits.
Step 6: Clean the EGR Passages
In addition to the EGR valve, the passages leading to and from it can also become clogged. Spray cleaner into these passages and use a brush or pipe cleaner to remove obstructions. Compressed air can also be used to clear out debris.
Step 7: Reinstall the EGR Valve
- Ensure that the mounting surface is clean before reinstalling the valve.
- If the gasket was removed, replace it with a new one to prevent leaks.
- Bolt the EGR valve back into place securely.
- Reconnect any hoses and electrical connectors that were detached.
Step 8: Reconnect the Battery and Test
- Reconnect the vehicle’s battery.
- Start the engine and let it idle for a few minutes to check for any rough running or abnormal behavior.
- Take the car for a test drive to ensure that it runs smoothly and efficiently.
- If the check engine light remains on, use an OBD-II scanner to clear any stored trouble codes.

Preventative Maintenance Tips
To keep your EGR valve functioning properly and reduce the need for frequent cleanings, follow these tips:
- Use high-quality fuel to minimize carbon buildup.
- Drive at highway speeds periodically to help burn off carbon deposits.
- Regularly check and replace air filters to prevent dirt from contaminating the system.
- Follow the manufacturer’s recommended maintenance schedule.
- Consider using a fuel system cleaner to help reduce carbon accumulation.
When to Replace the EGR Valve
If cleaning does not restore proper function, or if the valve is damaged or stuck, replacement may be necessary. Some modern vehicles use electronically controlled EGR valves that can fail due to internal electrical issues. If your EGR valve needs replacement, be sure to choose a high-quality part that matches your vehicle’s specifications.
Conclusion
Cleaning the EGR valve is an essential maintenance task that can significantly improve your vehicle’s performance and longevity. By following this step-by-step guide, you can restore proper airflow, reduce emissions, and prevent costly repairs down the line. If you’re unsure about handling this task yourself, consult a trusted mechanic to ensure the job is done correctly.
Taking the time to maintain your EGR valve will help keep your engine running efficiently and ensure a smoother driving experience. So, roll up your sleeves, grab your tools, and keep your engine in top shape!