Creating a well-defined path near a workshop not only enhances the aesthetics of the area but also improves safety, organization, and accessibility. One of the key steps in achieving a professional-looking path is the installation of curbs. Curbs provide structural support to the path, preventing erosion, maintaining edge integrity, and giving the path a clean, finished appearance. In this article, we’ll explore the planning, preparation, and step-by-step process of installing curbs along a workshop path.
Planning the Path and Curbs
Before beginning any physical work, proper planning is essential. The first step is to determine the purpose of the path. Will it be used for foot traffic, small vehicles, or as an access route for materials? The type of use will influence the size and strength of both the path and the curbs.
After defining the purpose, it’s time to map out the path. Use spray paint, stakes, or string lines to outline the exact area where the path will be laid. Consider water drainage, the natural slope of the land, and how the path connects to other areas such as driveways, garden plots, or garage entrances.
Once the layout is clear, decide what kind of curbs to install. Curbs come in different materials and styles: concrete curbs, brick edging, stone borders, or even prefabricated plastic or rubber edging. For a workshop environment, durability is key, so concrete curbs are often a preferred choice.

Preparing the Site
After finalizing the design and materials, the site must be prepared. This starts with clearing the area of grass, roots, and debris. Excavate the path and the edges where the curbs will sit. For most residential and workshop applications, a depth of 4–6 inches for the curb trench is sufficient.
Use a shovel or a mechanical trencher to dig a narrow trench along the edge of the path. The trench should be deep and wide enough to accommodate the curb base and the curb itself. Make sure the bottom of the trench is level and compacted. A hand tamper or a plate compactor can be used to firm up the base.
Next, lay a sub-base material, such as crushed gravel or compacted sand, to provide stability. This step is especially important for preventing shifting over time due to weather or ground movement.
Installing Concrete Curbs
Concrete curbs are a reliable and long-lasting option, especially for workshop paths that may experience occasional vehicle or heavy equipment traffic.
- Forming the Curbs:
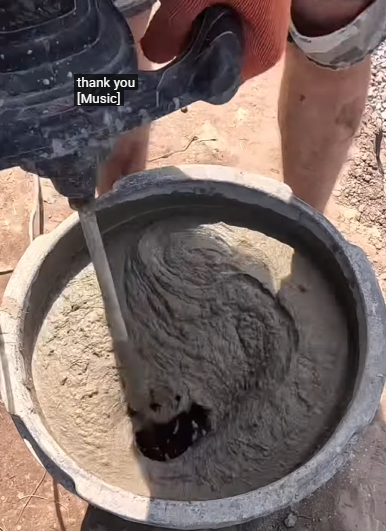
If you’re pouring your own concrete curbs, you’ll need wooden or plastic forms to shape the curb. Position the forms along the edge of the trench, securing them with stakes. Double-check that the forms follow the desired line of the path and that they are level and aligned. - Mixing the Concrete:
Prepare a concrete mix using either a premixed bag or by combining cement, sand, and gravel. The mix should be firm but workable—not too wet, so it doesn’t slump when poured. - Pouring and Shaping:
Pour the concrete into the forms, ensuring there are no air pockets. Use a shovel or a trowel to push the concrete into place. Once filled, smooth the surface with a trowel. If you prefer a rounded or beveled top edge, use an edging tool to shape it before the concrete begins to set. - Curing:
Allow the concrete to cure for at least 48 hours. During this time, keep the surface moist to prevent cracking. After curing, remove the forms carefully, and backfill any gaps between the curb and surrounding soil.

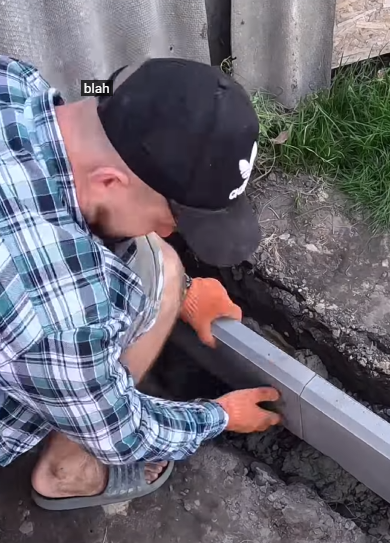
Using Prefabricated Edging
For a quicker and less labor-intensive solution, prefabricated curb sections or edging strips can be used. These are often made of concrete, stone, rubber, or recycled plastic.
- Setting the Base:
As with poured concrete, start with a firm, level base of gravel or sand. Lay out the prefabricated curb sections to test the fit. - Securing the Edging:
Depending on the product, you may need to secure the edging with spikes, adhesive, or a cement mix. Make sure each section is tightly aligned with the next to prevent shifting. - Finishing Touches:
Backfill along both sides of the curb to anchor it in place. Compact the soil or gravel around the curbs, and ensure that water can drain away from the path.
Benefits of Curb Installation
Adding curbs to a workshop path brings multiple advantages beyond just visual appeal:
- Structural Integrity: Curbs prevent the path materials, such as gravel or pavers, from spreading over time.
- Water Control: Properly installed curbs help channel rainwater and reduce the risk of erosion.
- Safety: Clearly defined path edges reduce trip hazards and keep equipment from veering off track.
- Low Maintenance: Once installed, curbs reduce the need for frequent edge trimming or repairs.
Common Mistakes to Avoid
- Poor Drainage Planning:
Always consider how water will flow along and away from the path. Poor drainage can lead to premature failure of both path and curbs. - Inadequate Base Preparation:
A weak or uneven base can cause curbs to crack or shift. Take the time to compact the soil and use a proper gravel sub-base. - Incorrect Alignment:
Double-check measurements and alignment before pouring or installing curbs. Once set, adjusting curbs is difficult and time-consuming. - Rushing the Curing Process:
If using poured concrete, allow it to fully cure. Walking or working on it too soon can lead to cracks or surface damage.
Conclusion
A well-laid path near a workshop can transform the space into a more organized, functional, and attractive area. Curbs play a critical role in defining that path, ensuring it lasts longer and remains visually clean. Whether you opt for poured concrete or prefabricated edges, taking the time to properly plan and install curbs will pay off in durability and performance. With the right materials and a bit of effort, your workshop path can go from rough and undefined to polished and professional—ready to support your daily work for years to come.