Foam block walls—also known as aerated concrete, AAC (Autoclaved Aerated Concrete), or foam cement blocks—are increasingly popular in modern construction. They’re lightweight, energy-efficient, and easy to cut, making them ideal for building. But when it comes to installing shelves on them, homeowners and DIYers often face a challenge: how do you mount something heavy on a wall that feels so soft?
In this detailed guide, we’ll walk through how to safely and effectively install shelves on a foam block wall, step-by-step, using the right tools, materials, and techniques.
Understanding Foam Block Walls
Foam block walls are different from solid concrete or brick. Their lightness comes from the millions of small air bubbles inside the material. This makes them great insulators but also less suitable for holding heavy loads—unless you take the right precautions.
Standard wall plugs or screws won’t hold for long in foam blocks. You’ll need special fixings and possibly additional support to make sure your shelves are secure.
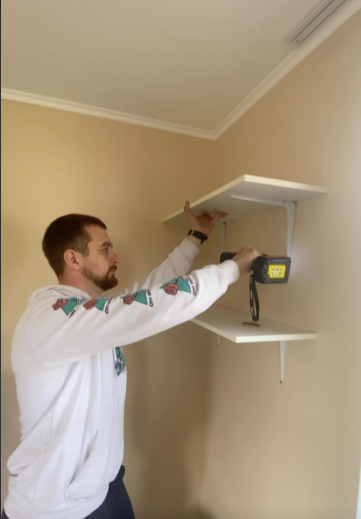
Step 1: Plan Your Shelf Placement
Before you grab your drill, decide exactly where you want your shelves to go. Use a pencil and a level to draw horizontal lines and mark the location of each bracket or mounting point. Consider the following:
- Height: Make sure shelves are within easy reach and aligned with nearby furniture.
- Load: Estimate the weight the shelf will carry—books? Kitchen items? Decorative objects?
- Spacing: For longer shelves, install brackets at shorter intervals (every 40–50 cm) to prevent sagging.
Step 2: Choose the Right Shelf and Brackets
Foam block walls aren’t suited for overly heavy, industrial-style shelves. Stick with light to medium-weight shelves, made from MDF, plywood, or metal.
When choosing brackets, make sure they are:
- Wide enough to distribute the load
- Sturdy, with multiple mounting holes
- Compatible with the depth of your shelf
Avoid cantilever-style brackets that rely on a single anchor point. The more screws and contact with the wall, the better.
Step 3: Use the Right Anchors
This is the most critical step. Regular plastic wall plugs won’t work with foam blocks, especially for any load-bearing installation. Here are some recommended fixings:
1. Chemical Anchors (Resin Anchors)
- These involve injecting a special resin into a drilled hole, then inserting a threaded rod or bolt.
- Once cured, the bond is extremely strong and reliable.
- Great for mounting shelves, TVs, and cabinets.
2. Special Foam Block Anchors
- These are plastic or metal anchors designed to spread out inside soft materials.
- Some types screw in directly and expand as you insert the screw.
- Brands like Fischer or Hilti make reliable foam block fixings.
3. Through-bolts with Large Washers
- In cases where both sides of the wall are accessible, a bolt can be passed entirely through the wall.
- Use washers and nuts to secure it on both ends.
For most DIY users, resin anchors or expanding foam block anchors will be the most effective and available solution.
Step 4: Drill the Holes
Use a low-speed rotary drill with a masonry bit that’s slightly larger than your anchor diameter. Follow these tips:
- Depth: Drill deep enough to accommodate the full anchor and screw.
- Dust: Clean out dust with a vacuum or by blowing into the hole. Leftover dust can reduce holding power.
- Care: Don’t use a hammer drill! The pounding action can damage foam blocks or create oversized holes.
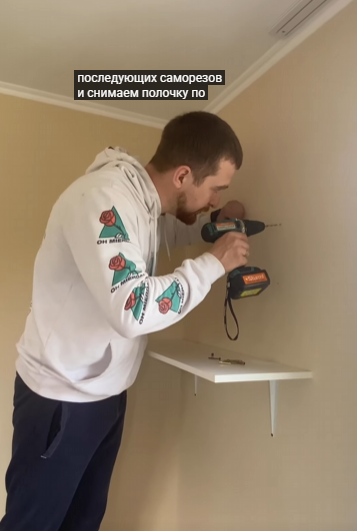
Mark and drill each hole based on your bracket’s screw holes, double-checking alignment and spacing as you go.
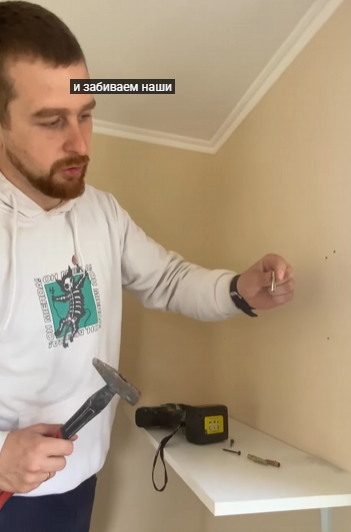
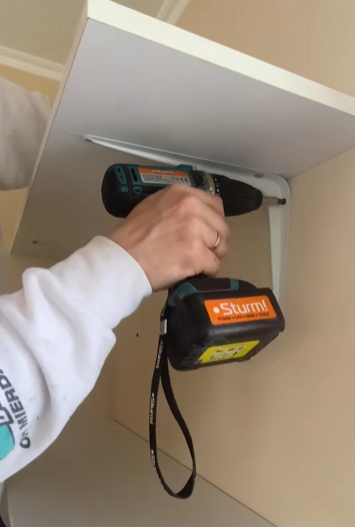
Step 5: Insert Anchors and Mount the Brackets
Depending on your chosen anchor, follow the manufacturer’s instructions:
- For chemical anchors, inject the resin first, insert the rod, and allow time to cure (usually 30–60 minutes).
- For expanding block anchors, insert by hand or with a screwdriver, making sure they sit flush with the wall surface.
- Then screw your brackets into place, tightening firmly but not too much—over-tightening may damage the wall.
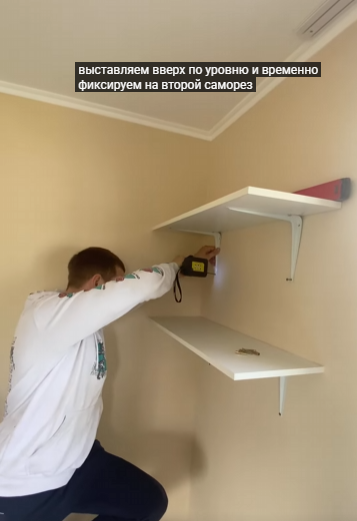
Use a level to ensure all brackets are aligned before proceeding.
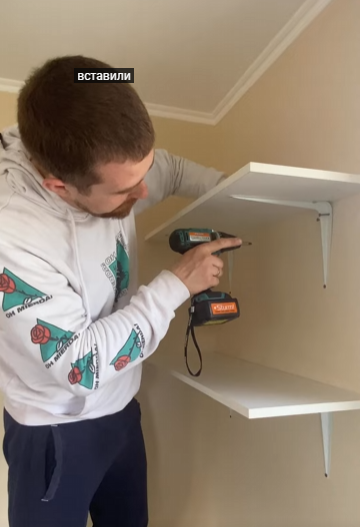
Step 6: Attach the Shelf
Once all your brackets are securely mounted:
- Place the shelf board on top.
- Check alignment and make sure it’s level.
- Use wood screws to fasten the shelf to the brackets (if applicable).
- Test the stability by gently applying pressure.
Step 7: Add Extra Support (Optional)
If you’re concerned about long-term stability—especially for heavy shelves—consider additional reinforcement:
- Back supports that tie the shelf into adjoining walls
- Vertical struts that transfer weight to the floor
- L-shaped wall rails that distribute load more broadly
In kitchens or garages, where shelves often hold heavy tools or pantry items, extra support is always a good idea.
Common Mistakes to Avoid
Here are a few errors to avoid when working with foam block walls:
- Using drywall anchors or plastic plugs: These don’t expand well in foam and will pull out over time.
- Drilling with a hammer drill: This can ruin the structural integrity of the wall material.
- Overloading the shelf: Even with good anchors, foam block walls have limits. Stay within safe weight ranges.
- Ignoring resin curing time: Rushing this step can lead to failure.
Final Tips
- Practice first: If you’ve never worked with foam blocks, try mounting a test bracket on a scrap piece or an inconspicuous spot.
- Use good-quality tools: A dull drill bit or wobbly bracket will give you bad results.
- Stay safe: Always wear safety glasses when drilling, and use a dust mask if needed.
Conclusion
Installing shelves on a foam block wall might seem like a tricky job, but with the right approach, it’s completely manageable—even for beginner DIYers. The key is to understand the nature of foam block material, choose the right fixings, and never rush through critical steps like anchoring.
Whether you’re hanging bookshelves in the living room or adding spice racks in your kitchen, follow this guide for a sturdy and long-lasting result. You’ll have a clean, functional, and beautiful storage solution that’s secure—no matter what the wall is made of.